Wednesday, November 27, 2013
Saturday, October 26, 2013
Breast Growing Massage Steps
Breast Growing Massage Steps
1. Rub your hands together very vigorously to generate heat.2. Place your hands on your breasts and feel the heat seep into your breasts.
3. Rub your breasts gently but firmly outwards in circular motions (right hand in a clockwise direction and the left hand in a counterclockwise direction).
4. Perform a minimum of 100 circles and a maximum of 300 circles but you can perform circles of as many as you desire but ensure that you perform the same number of counts on each breast in each direction.
5. Rub your hands together again briskly and reverse directions, i.e. rub your breasts in inward, circular motions in order to stimulate your breasts (right hand in counterclockwise direction and the left hand, clockwise). Performing this direction will actually help to increase the size of your breast as well as the firmness. You may perform this direction only if you prefer and eliminate the outward motion discussed above.
6. Perform these circles morning and night.

Wednesday, July 24, 2013
Nails and Health: Read the Signs
Did you know your nails can reveal clues to your overall health? A touch
of white here, a rosy tinge there, or some rippling or bumps may be a
sign of disease in the body. Problems in the liver, lungs, and heart can
show up in your nails. Keep reading to learn what secrets your nails
might reveal.
Very pale nails can sometimes be a sign of serious illness, such as:
If the
nails are mostly white with darker rims, this can indicate liver
problems, such as hepatitis. In this image, you can see the fingers are
also jaundiced, another sign of liver trouble.
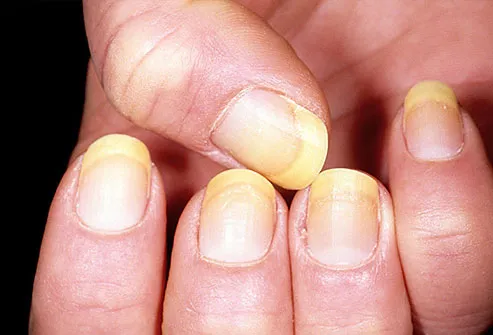
One of
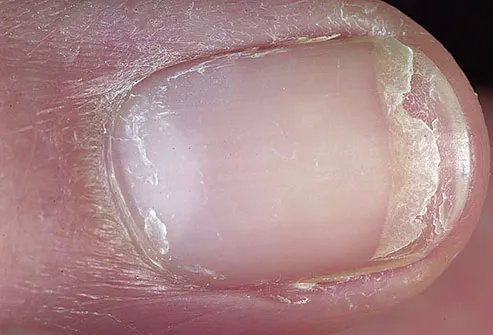
the most common causes of yellow nails is a fungal infection. As the
infection worsens, the nail bed may retract, and nails may thicken and
crumble. In rare cases, yellow nails can indicate a more serious
condition such as severe thyroid disease, lung disease, diabetes or
psoriasis.
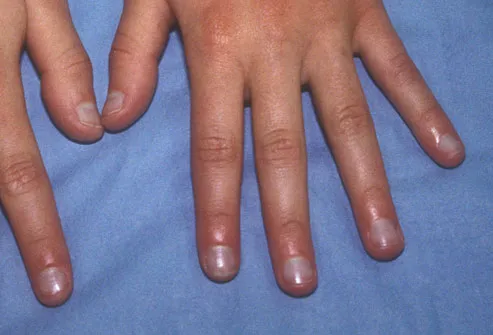
Nails
with a bluish tint can mean the body isn't getting enough oxygen. This
could indicate an infection in the lungs, such as pneumonia. Some heart
problems can be associated with bluish nails.
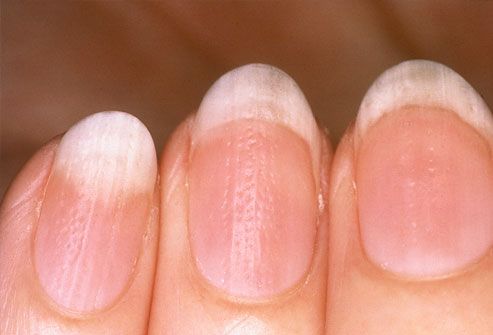
If
the nail surface is rippled or pitted, this may be an early sign of
psoriasis or inflammatory arthritis. Discoloration of the nail is
common; the skin under the nail can seem reddish-brown.
Dry,
brittle nails that frequently crack or split have been linked to
thyroid disease. Cracking or splitting combined with a yellowish hue is
more likely due to a fungal infection.
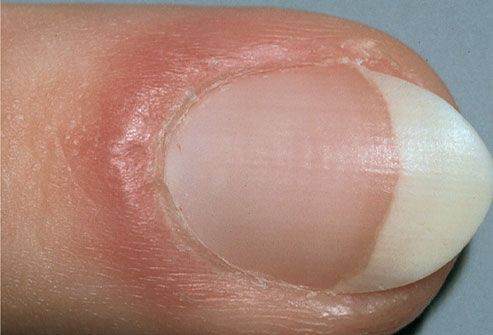
If
the skin around the nail appears red and puffy, this is known as
inflammation of the nail fold. It may be the result of lupus or another
connective tissue disorder. Infection can also cause redness and
inflammation of the nail fold.
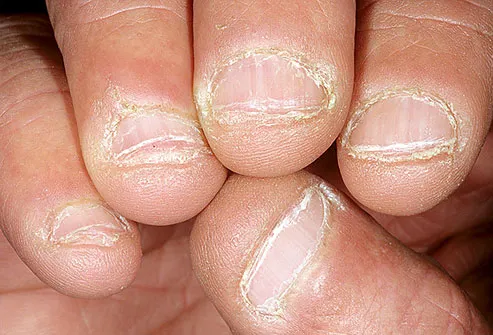
Biting
your nails may be nothing more than an old habit, but in some cases
it's a sign of persistent anxiety that could benefit from treatment.
Nail biting or picking has also been linked to obsessive-compulsive
disorder. If you can't stop, it's worth discussing with your doctor.
Pale Nails
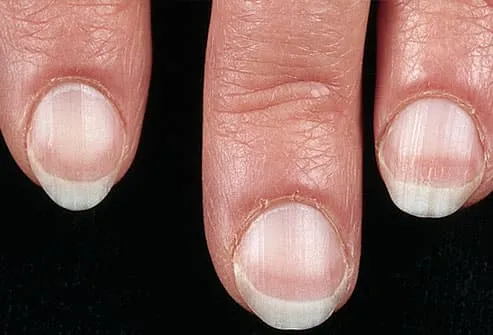
- Anemia
- Congestive heart failure
- Liver disease
- Malnutrition
White Nails

Yellow Nails
Bluish Nails
Rippled Nails
Cracked or Split Nails
Puffy Nail Fold
Gnawed Nails
Sunday, July 14, 2013
Tame your eyebrow

STEP 1: Using a brush or brow pencil create a
straight line from your nostril to the inside of your eye. This will
determine the innermost point of the brow.

STEP 2: Now measure from your nostril to the outside of the eye. That will be the end-point of your brow.

STEP 3: Measuring from the nose to the pupil will indicate the high-point of your arch.

Now you have the main points of your brow defined.

STEP 4: Select the stencil that best fits your
natural brow shape. The line at the top of the stencil should be
parallel to the ground. Apply brow wax inside the stencil to give your
brow powder something to stick to.

STEP 5: Use brow powder or a brow pencil to
fill in the shape of the stencil. Short strokes will give your brow a
more natural, hair-like look.

STEP 6: Remove the stencil and finish the brow
freehand. Clean up any edges and adjust both sides to make sure they're
symmetrical.

The left side shows before the brows were completed, the right side is the finished look.

And voila! Perfect brows every time!
Friday, July 5, 2013
Body Acne: How to Get Rid of It
As you strive to get bikini ready this summer, you may find yourself focusing less on how to tone up flabby thighs and more on unsightly skin issues like "bacne" ... or dare we say it, cleavage zits!
 Sure,
acne most commonly plagues the face, but other body parts -- the back,
chest, butt and arms -- aren't immune to these nasty eruptions.
Sure,
acne most commonly plagues the face, but other body parts -- the back,
chest, butt and arms -- aren't immune to these nasty eruptions.
Here are five strategies to help keep pesky pimples at bay:
1. Cover up carefully. Fusco recommends non-comedogenic (yes, you need to look for that term on the label; you'll thank us later!) oil-free sunscreens. And when it comes to working out in the heat, make sure to wear cotton T-shirts or tank tops to help wick away sweat. If you work out in a class, bring a towel and always use it on a mat. Mats are teeming with bacteria, particularly the community ones.

Thursday, July 4, 2013
Beauty Myths About Your Hair
Myth: If you use the same shampoo, it will stop working.

Solution: It's always great to try something new but like the old saying goes, "if it ain't broke, don't fix it."
Summer 2013: What’s New in Nails?
Ever since smart phones replaced handbags as the “It” accessory, nails have gotten their fair share of the limelight. (Chalk it up to all the texting, tweeting and Instagram-ing they’re now busily engaged in.) So why not try a statement-making manicure worthy of its own hashtag? New technology allows for more creativity than ever. Here, eight photo-ready trends that will have you garnering followers on all your feeds.

The Best Nude Nail Polish For Your Skin Tone

Nude nail polish can make your fingers look long and graceful, and your skin glow—if you find the right shade, that is. We find that our nude manicures often end in disappointment (too pink, too brown, too chalky, too just-wrong), because we’ve used a shade that does not truly complement our skintone. There’s more to it than just light, medium or dark: Nude tones are particularly challenging to match because, like your skin, they’re imbued with subtle undertones that can range from pink to yellow to olive.
How to Look Good when You Wake Up
Remove all makeup before going to bed. Do not sleep with any makeup on; otherwise, it's almost guaranteed to smear overnight and ruin your skin as well as your look in the morning.

Rinse your face with hot water to open your pores and prepare your skin for a deep cleanse. Using the tips of your index and middle fingers, lather facial wash across your face in circles, scrubbing thoroughly. Then use cold water to rinse off the cleanser and close your pores.

Take care of your hair before going to bed. If you sleep with unkempt hair, it will only become worse and more entangled in the morning. If you take nighttime showers, it's a good idea to wait until your hair air dries and then brush through it before going to sleep. Alternatively, blow dry your hair and brush it.
Brush Your Teeth the Night Before. Brushing your teeth at night is actually proven to be more important than brushing your teeth in the morning. If you don't, your teeth will be very noticeable and gross in the morning.

Chapped Lips. People often have chapped lips when they awaken in the morning from all night of no lipgloss, lipstick, sunscreen, chapstick, or liquids! To try to prevent this, put on chapstick and drink water before and after you wake up.
Never try to sleep with wet hair.

Rinse your face with hot water to open your pores and prepare your skin for a deep cleanse. Using the tips of your index and middle fingers, lather facial wash across your face in circles, scrubbing thoroughly. Then use cold water to rinse off the cleanser and close your pores.
Take care of your hair before going to bed. If you sleep with unkempt hair, it will only become worse and more entangled in the morning. If you take nighttime showers, it's a good idea to wait until your hair air dries and then brush through it before going to sleep. Alternatively, blow dry your hair and brush it.
Brush Your Teeth the Night Before. Brushing your teeth at night is actually proven to be more important than brushing your teeth in the morning. If you don't, your teeth will be very noticeable and gross in the morning.
Chapped Lips. People often have chapped lips when they awaken in the morning from all night of no lipgloss, lipstick, sunscreen, chapstick, or liquids! To try to prevent this, put on chapstick and drink water before and after you wake up.
Never try to sleep with wet hair.
The Benefits of Scalp Massage for Hair Loss
In addition to stimulating blood flow through the scalp and increasing the probability of healthy hair growth, scalp massage is soothing and can help prevent headaches as well as benefit sleep patterns.

p/s: see more at: http://www.pacificcollege.edu/acupuncture-massage-news/articles/1000-the-benefits-of-scalp-massage-for-hair-loss.html#sthash.0aWYCG47.dpuf
p/s: see more at: http://www.pacificcollege.edu/acupuncture-massage-news/articles/1000-the-benefits-of-scalp-massage-for-hair-loss.html#sthash.0aWYCG47.dpuf
How to Give Yourself a Scalp Massage with your fingers
The beauty of this massage is that it can be done anywhere without the need for anything other than your fingers.
-
Sit down somewhere comfortable. The less distractions, the better so that you can concentrate
on what is happening. However, there's no harm squeezing this into the
ads of a favorite show provided you press the mute button!

-
Place the fingers of both hands on your forehead.
They should meet one another at an imaginary center line of your
forehead. Rest the thumbs on your temples; they will provide support.

-
Apply pressure. Make the pressure firm but light, as you press, then release.

-
Shift your fingers slightly further up your forehead nearer to the hairline and raise your thumbs with them. Repeat the press and release movement.

-
Keep moving this position up and onto the scalp, bit by bit, repeating the pressure/release movement. Follow the line of the Governor Vessel meridian (see "Tips"); approximately the center of your scalp.

-
At the top of your head, apply pressure to your head at the acupoint Governor Vessel 20. This is located about three quarters of the way on the top of your scalp.

-
Move down the back of your scalp now.
Release the pressure from the acupoint Governor Vessel 20 and continue
pressing down the center of your scalp line. As before, continue moving
the fingers down in the same position, while moving the support thumbs
down at the same time.

-
Once you have reached the the base of your skull, return to the front.
This time, position your hands about half an inch (1.27cm) either side
of the mid-line of your head (in other words, this time your fingers
won't be meeting but have a gap either side of the imaginary line across
your forehead).

-
Do the press and release movement as before in this new position, moving up and then down the scalp as before.

-
Return and repeat.
This time, make the gap between your fingers and the center line of your
head 1 inch (2.5cm) either side. Your fingers should now be almost on
the sides of your head.

-
Again, do the press and release movement in this new position.

-
When you feel adept at this massage, synchronize it with your breathing, inhaling and exhaling as you press and release. This will help to calm you as well as allowing you to focus on the releasing tension to leave your scalp feeling refreshed.


Subscribe to:
Posts (Atom)